AAF From Premiere Pro to Pro Tools or Nuendo
When you're exporting audio from your project, it's crucial to follow the correct procedure to avoid issues such as loading failures in Pro Tools or data loss during transfer. The most reliable method to ensure all your audio reaches us intact is by creating an AAF export.
These are the default setting you should use when exporting an AAF from your timeline in Premiere Pro:
Make sure the correct timeline is selected
Choose File > Export > AAF
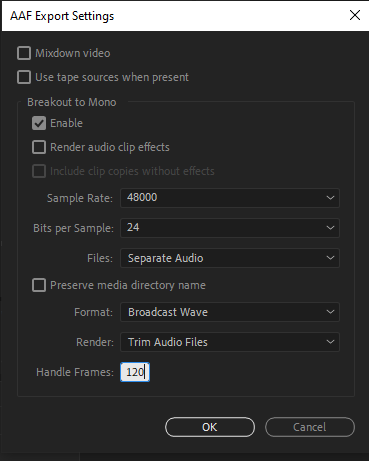
In some instances we might ask to copy complete audio files. But for most projects Trim audio files does the job.
Save the AAF file on a local hard drive, and note that all audio files are contained within a subfolder named "AAF Media." It's essential for us to receive both the AAF file and the accompanying folder containing the audio files.

The following things will corrupt the AAF file!
It’s very important to note that Premiere Pro will not notify you with an error message if there are issues present in the timeline; instead, it simply exports a corrupt AAF.
Special characters, like /, >, <, ®, and ü, Ø, Æ, Å.
Using Merged Clips in the timeline.
Nested sequences.
If a clip has a transition at both the In and Out points, the clip must be at least the same length as both transitions combined.
Also be aware that choosing to embed the audio files in the actual AAF will strip meta data from the sound files. This won’t corrupt the AAF, but we no longer will have the data that is used to identify the scene, take and the sources recorded. In some scenarios we might ask for audio to be embedded and if so, we will let you know the correct settings.

Simplify if it isn’t working
Sometimes the AAF file just dosen’t work even though you have followed the guidlines. This can be super frustrating. If this is the case the optimal fix is to simplify your timeline.
Locate your timeline in the bin > Right click > Dublicate
Rename to (Projectname)_AAFcleanup
In the new timeline remove all video tracks, remember to unlink from audio files first! This should leave you with a sequence only with the audio tracks you want to export.
Go over the audio clips in your sequence and look for unsupported characters like Æ,Ø, Å and rename the files in your sequence (not in the bin). If the names are not displayed on the audio clips in the sequence click the Wrench (Timeline Display Settings) > Show Audio Names.
Export the cleaned timeline as a Final Cut XML sequence
File > Export > Final Cut Pro XMLImport the Final Cut Pro XML file you just created back into the Premiere Pro Project. This gives you a simplified sequence, without Nested Clips or Merged Clips, if they were present.
Rename this sequence (Projectname)_AAFfixed, and follow the normal AAF export procedure as described above.
Other files needed for your Project
In addition to the AAF and the AAF media folder we also will need a Video reference, preferably picture has been locked at this point!
Preferred video codec would be Pro Res or DNxHD but we understand those files can be massive. So we now ask for an MP4 and we will transcribe it on our end.
On this video reference please include a 2-Pop. If you are unaware, a 2-Pop is a term for a 1 kHz (1000 Hz) tone that lasts 1 frame inserted 2 seconds before the start of the program at 00:59:58:00. Usually this is also referenced by a countdown. This countdown can be created in the Universal Counting Leader Setup Dialog Box. To access this in the project panel click the new item button at the bottom of the panel and choose universal counting leader. In the setup dialog box please ensure that the cue blip on 2 is selected. Also uncheck cue blip at all second starts. Other than that you can customize the look to your preference. This is very important as it gives us certainty that our picture and sound are in sync when moving projects between Video editors and Sound editors.
In addtion to the 2-Pop please burn in timecode. Select your Preset of choice in Media Encoder and pull up the Preset Settings. Under Effects, scroll down until you find the same Timecode Overlay option.
In some instances there might be additional recordings that were not used in the project but could be of benefit for the Audio Post team. If you have addtional sound recordings please also send those our way. Who knows what gems we might discover in those recordings.