
AAF From Premiere Pro to Pro Tools or Nuendo
Workflow for exporting an AAF from Premiere Pro for Post Audio and how to troubleshoot if it doesn’t work.
When you're exporting audio from your project, it's crucial to follow the correct procedure to avoid issues such as loading failures in Pro Tools or data loss during transfer. The most reliable method to ensure all your audio reaches us intact is by creating an AAF export.
These are the default setting you should use when exporting an AAF from your timeline in Premiere Pro:
Make sure the correct timeline is selected
Choose File > Export > AAF
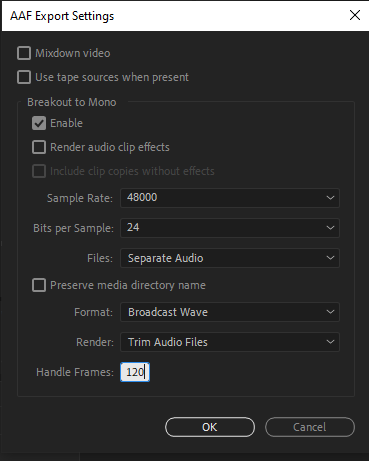
In some instances we might ask to copy complete audio files. But for most projects Trim audio files does the job.
Save the AAF file on a local hard drive, and note that all audio files are contained within a subfolder named "AAF Media." It's essential for us to receive both the AAF file and the accompanying folder containing the audio files.

The following things will corrupt the AAF file!
It’s very important to note that Premiere Pro will not notify you with an error message if there are issues present in the timeline; instead, it simply exports a corrupt AAF.
Special characters, like /, >, <, ®, and ü, Ø, Æ, Å.
Using Merged Clips in the timeline.
Nested sequences.
If a clip has a transition at both the In and Out points, the clip must be at least the same length as both transitions combined.
Also be aware that choosing to embed the audio files in the actual AAF will strip meta data from the sound files. This won’t corrupt the AAF, but we no longer will have the data that is used to identify the scene, take and the sources recorded. In some scenarios we might ask for audio to be embedded and if so, we will let you know the correct settings.

Simplify if it isn’t working
Sometimes the AAF file just dosen’t work even though you have followed the guidlines. This can be super frustrating. If this is the case the optimal fix is to simplify your timeline.
Locate your timeline in the bin > Right click > Dublicate
Rename to (Projectname)_AAFcleanup
In the new timeline remove all video tracks, remember to unlink from audio files first! This should leave you with a sequence only with the audio tracks you want to export.
Go over the audio clips in your sequence and look for unsupported characters like Æ,Ø, Å and rename the files in your sequence (not in the bin). If the names are not displayed on the audio clips in the sequence click the Wrench (Timeline Display Settings) > Show Audio Names.
Export the cleaned timeline as a Final Cut XML sequence
File > Export > Final Cut Pro XMLImport the Final Cut Pro XML file you just created back into the Premiere Pro Project. This gives you a simplified sequence, without Nested Clips or Merged Clips, if they were present.
Rename this sequence (Projectname)_AAFfixed, and follow the normal AAF export procedure as described above.
Other files needed for your Project
In addition to the AAF and the AAF media folder we also will need a Video reference, preferably picture has been locked at this point!
Preferred video codec would be Pro Res or DNxHD but we understand those files can be massive. So we now ask for an MP4 and we will transcribe it on our end.
On this video reference please include a 2-Pop. If you are unaware, a 2-Pop is a term for a 1 kHz (1000 Hz) tone that lasts 1 frame inserted 2 seconds before the start of the program at 00:59:58:00. Usually this is also referenced by a countdown. This countdown can be created in the Universal Counting Leader Setup Dialog Box. To access this in the project panel click the new item button at the bottom of the panel and choose universal counting leader. In the setup dialog box please ensure that the cue blip on 2 is selected. Also uncheck cue blip at all second starts. Other than that you can customize the look to your preference. This is very important as it gives us certainty that our picture and sound are in sync when moving projects between Video editors and Sound editors.
In addtion to the 2-Pop please burn in timecode. Select your Preset of choice in Media Encoder and pull up the Preset Settings. Under Effects, scroll down until you find the same Timecode Overlay option.
In some instances there might be additional recordings that were not used in the project but could be of benefit for the Audio Post team. If you have addtional sound recordings please also send those our way. Who knows what gems we might discover in those recordings.

Editor prep before AAF Export
Editor timeline prep before export
Occasionally, production teams inquire about the preferred method for picture editors to submit materials for a sound post-production booking. While workflows continuously evolve, certain universally recognized standards have remained steadfast over time. In this article, we will detail these standards.
Targeted at both beginner and intermediate editors, this guide is also valuable for producers. Adhering to these editing best practices can save time and lead to significant cost savings during the sound post-production phase.
Track Layout
As fellow editors in the hectic post world we know that turnaround times can be crazy. Out of all of the things that can be done to make your sound editor happy, organizing and tiding up your track layout is the most important. In addition, having your template organized in such a way for audio will also make your life easier as you navigate through your edit.
A1 VO/Guided Narration
A2 Sync Dialog/Boom
A3 Sync Dialog/Lav if multiple characters you can spread them out over subsequent tracks
A4-8 Sfx
A9-10 Stereo Music
A11-12 Stereo Music
A13 Work track for destructive effects
The plan is to minimize tracks and organize them into food groups VO, Dialog, Sfx, Mfx. If you have a scene with a Boom and multiple Lav’s please put all iso tracks on the timeline. Don’t mute or delete clips unless you are sure they are not usable.
Destructive Processes, Volume adjustments and Fades
One of the first steps an audio engineer will do upon importing your AAF is to remove all of your volume automation. This is crucial for the post team in order to make sure what they are intending for the mix doesn’t get confused with previous automation. If you have unwanted audio in a clip, the preference is to delete that audio not to ride your volume automation down. Fades on clips are the preferred method of volume attenuation. If you feel a clip is not loud enough please use clip gain to bring it up. Do not double up the clip to make it louder.
NLE’s now come with a slew of audio plug-ins especially some handy noise reduction plug-ins. Do not destructively bake these plug-ins into the clips. Post audio will deal with eq, compression, limiting, noise reduction and effects. If production wants to hear noise reduction on a clip or if there is a certain effect you want to have in the mix, supply both the unaltered clip and the processed clip on the timeline. I would suggest putting the processed clip on a work track. Destructive means just that. The post team will not be able to fix these processes. Currently Adobe’s Podcast AI voice resynthesizer tool is being overused. Please don’t throw this on you dialog and pass it off to post. Also be aware that whatever you send to Adobe they have full rights to use. Your clients might not be too happy about that.
Other thoughts and considerations
If production sound supplies you with room tone. Go ahead and put it on the timeline further down. You can try to use it to fill gaps but don’t worry too much about making a perfect seamless loop. Post audio will take care of that. If there is room tone and you don’t add it to your project make sure to send that over with the project. Also, if you are asked to make a dreaded Frankenbite edit to dialog please supply all of the options including outtakes. Lastly, make sure that your music edits are in time and looping smoothly. Huge crossfades will not cover up misaligned music. If the audio engineer is asked to correct this there is a good chance your edit timing will no longer work and that big impactful musical moment will fall flat.
All editors have their own workflow and NLE’s are constantly changing. But these tips, especially the track layout will imporve your workflow and cut down on organizational time for post audio. It’s a Win Win. After your session is prepped for export go to the next page for AAF best practices.